This is a construction example of some of the methods I used to edit the photos for our magazine. Mainly by using the lighting functions on Photoshop Elements 6.0
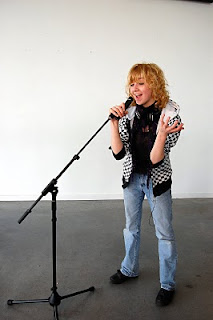
This is one of the many photos I took for our magazine; her character is the lead singer for a band that our magazine is covering. Before taking the image to photoshop, I have already enhanced it slightly on Nikon PictureProject by edited the lighting, colour, sharpening and shadows. For the desired message to come through in the photo I wanted to add a spotlight.

This is the original, slightly enhanced image.

As the image connotates ideas of performing/singing on stage, I thought that a spotlight would be fitting. To do this, I opened up Photoshop Elements 6.0. Went to FILTER -> RENDER -> Lighting Effects.

A normal spotlight would have completely blacked out the background; the Lighting Effects controls have a variety of different artifical lights. This can be done by clicking the small box next to STYLE, and choosing from the drop down list. For this photo, I decided to go with Soft Spotlight.

The preview box will then give you a preview of the selected light. The light is surrounded by a huge oval with various points that you can change (width, height, direction, etc) and the options on the right change how the light looks.

As I wanted the photo to have a very amateur, practice feel; I put the light down to 'Matte' this basically means that it will look much more like an average house light, rather than a professional spotlight.

Exposure is how much of the modelthe light covers, I purposely put this under to make it seem like she is performing into a spotlight.

Ambience is how concentrated the light is to the 'oval', the more positive it is, the more of the background it will light up.

Once you click OK, the spotlight has been added.

To add futher effect, I decided to add a lens flare; I love to use these on photos as they are very faint but effective.

After adding the lens flare, I felt as though some over-head lighting would prove effective if this image was to be used in the double-page spread.
 Again, like the spotlight you can control which direction the light is facing, how long the light is, and where it starts and finishes.
I decided to move them out slightly so that they are shining on her and her only.

The Plastic/Metallic option is referring to the material of the light; if you choose plastic, the light will look a lot duller than the metallic. As this is a triple spotlight, I decided with the nice, clean metallic light.

You can also change the colour of the lights with the small colour patch next to the INTENSITY option. When I was choosing the colour, I went for the traditional cream/off white.


No comments:
Post a Comment